


Nature Keepsakes
These natural items are beautiful finds, for sure, but what do you do with them once you’ve brought them home? At first glance, you might think about leaving that granite stone or bright fall leaf in the backyard, but there are plenty of ways to show off the gems of the outdoors, indoors.
Read on for our favorite ways to turn your natural items into nature keepsakes.
 If you have tons of bits and bobs around the house from various hikes and trips to the lakeshore, then a trinket shelf will be perfect for you! These shelves are great for displaying everything from Petoskey stones to feathers, shells, bits of bark, sprigs of pine, and beach glass, all in one place! It’s great for busy decorators, too, because the setup is a snap once you have the shelf!
So, where do you find a trinket shelf? Plenty of places on the internet (especially Etsy) sell frames made explicitly for showing off small items like crystals, but you can also improvise your own. Shadow boxes are a great choice, as well as bookshelves, spice racks; you name it! One of our favorite solutions has to be upcycled letterpress drawers. These unique drawers were once used in letterpress studios and have little cubbies and spaces perfect for nature keepsakes.
 Leaves and flowers are markers of the changing seasons. Spring violets to fall leaves, these bits of nature are fun to gather and even more fun to preserve and display! Both flowers and leaves dry out and press easily and will be a wonderful reminder of your favorite season.
Once dried and pressed, this foliage looks beautiful framed and makes a wonderful addition to letters, scrapbooking, gift wrapping, you name it! Try finding out a friend’s favorite flower and pressing it for them as a gift, or sending a dried version of a local leaf to an out-of-state family member in a letter. Check out our pressed-flower arrangements below:

Want to learn more about the flowers you’ve collected? Try our Wildflowers of Michigan Field Guide.  Another decoration option that looks great with minimal money and time investment is a decorative jar! Jars are perfect if you have tons of rocks and Petoskey stones that you just can’t part with but haven’t found a use for yet.
You can find all sorts of jars just about anywhere, from craft stores to home decor shops to thrift stores and Facebook marketplace. They come in all types, with screw lids and glass lids, cork tops, and a rainbow of glass colors!
Layer your heavier items at the bottom of the jar and top it off with a few lighter natural objects, like pine sprigs, branches, or pine cones. Then, add some extra jars in different sizes for an entire display! Leaves, especially fall leaves, come in all shapes and sizes! But, what if you don’t want to keep the armload of leaves that you or your little one brought home?
There are tons of ways to make artwork with leaves that will help you remember that sunny fall morning without having to preserve the leaves themselves. Leaf prints are easy to make with all types of materials. Markers, acrylic paints, pencils, and even stamp pads are perfect for creating leaf prints! Here are a few tried and true methods:

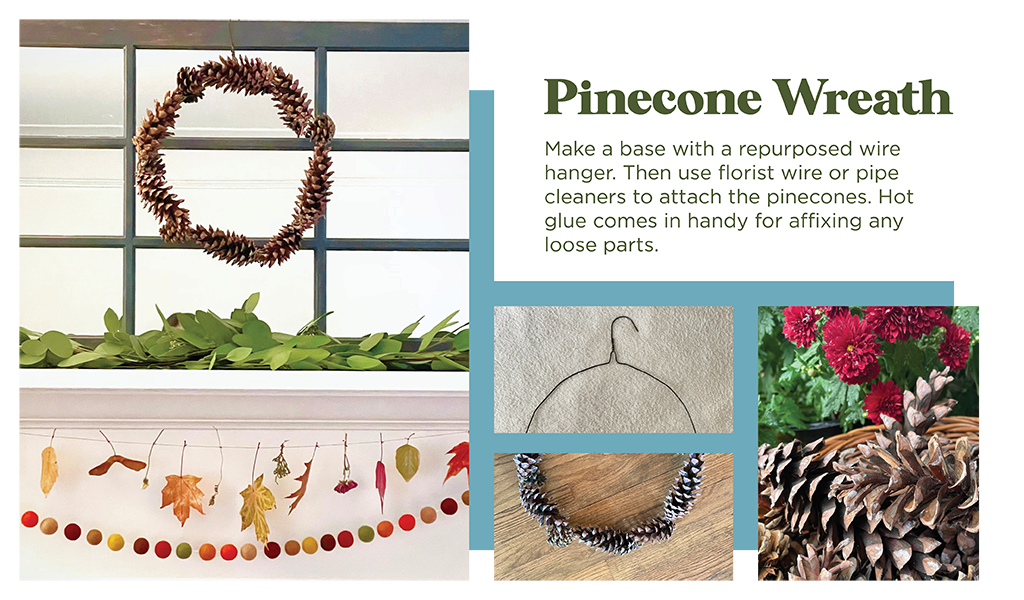 Pinecones are charming additions to any home decor, especially as a wreath! Sure, you could buy some at a local craft store, but why do that when you could spend an afternoon outdoors in the sunshine and collect a few for free? Plus, it will look stunning on your front door and impress your neighbors when you tell them you made it yourself!
Word to the wise: Cleaning Found Acorns and Pinecones
If you’re working with hand-foraged acorns and pinecones, you’re going to want to clean them first. Otherwise, you may come across an unwelcome guest while crafting. Not many folks want an acorn weevil in their wreath. Thankfully, acorns and pinecones are easy to clean!
- Soak your pinecones and acorns in a bucket of warm water with 1 cup of white vinegar for 30 minutes. The pinecones will close up a bit, but don’t worry! They open back up with time and heat.
- Let pinecones and acorns dry overnight.
- Bake your pinecones and acorns on a foil-covered baking sheet in the oven at a low, low 200 degrees. Let them cook for anywhere from 30 minutes to two hours. The longer you cook your cone, the more “bloomed” it will be. Plus, a longer cook at a slightly higher temp (think 225) will melt any sap on the cones giving it a “glazed” look.
- The most important part: check on your cooking cones at least every 30 minutes to ensure the right amount of “bloom” and monitor for any burning (we are talking about cooking wood, here)!
- Take out of the oven and let cool. If the sap on your cones has melted, it will eventually harden and become less sticky.
